The Alchemist Protocol
Two identities. One space. Now your space will follow.
00 — What You're About to Do
This is not a style guide.
This is a system. Apply it once. Benefit every day.
Follow the steps in order. Your space will:
- reduce visual noise
- shorten decision time
- feel structurally calm
No guesswork required.
01 — Quick Start (Do This First)
Before reading further:
→ Walk into your main room
→ Stand still for 10 seconds
→ Notice what your eye does
If it keeps moving, scanning, or hesitating:
"This confirms your Sovereign profile. Now we fix it."
02 — The 3 Core Corrections
You don't need to change everything. Correct three structural failures.
1. REMOVE L5 — Concealed Inventory Eliminate visual noise
Reduce visible objects by at least 60%. Most homes show too much.
→ empty all open shelves
→ keep only 1–2 intentional items
→ everything else goes into closed storage
If you hesitate: hide it first, decide later.
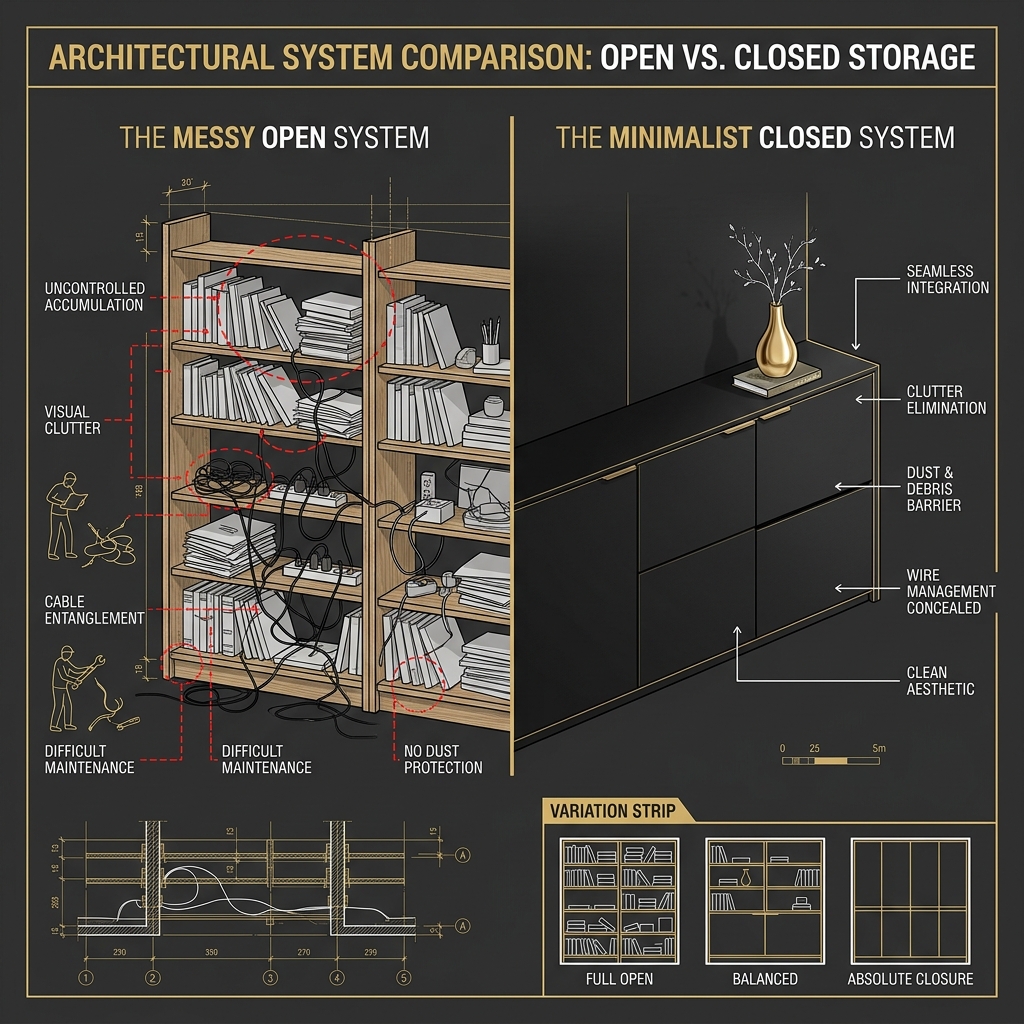
DIAGNOSTIC L5 — Open Shelving vs. Closed Systems (3-Step Variation Strip)
1. CONCEAL L9 — Kinematic Space Hide the work mode
Your space cannot always be a home office. Hide the equipment to reclaim the evening.
→ use foldable or drop-down surfaces
→ store hardware out of sight when finished
→ keep the center circulation clear
If you see your monitor from the sofa → still wrong
If the room looks like a pure living space at 8PM → correct

DIAGNOSTIC L9 — Blueprint Hierarchy: Kinematic Fold-Away System
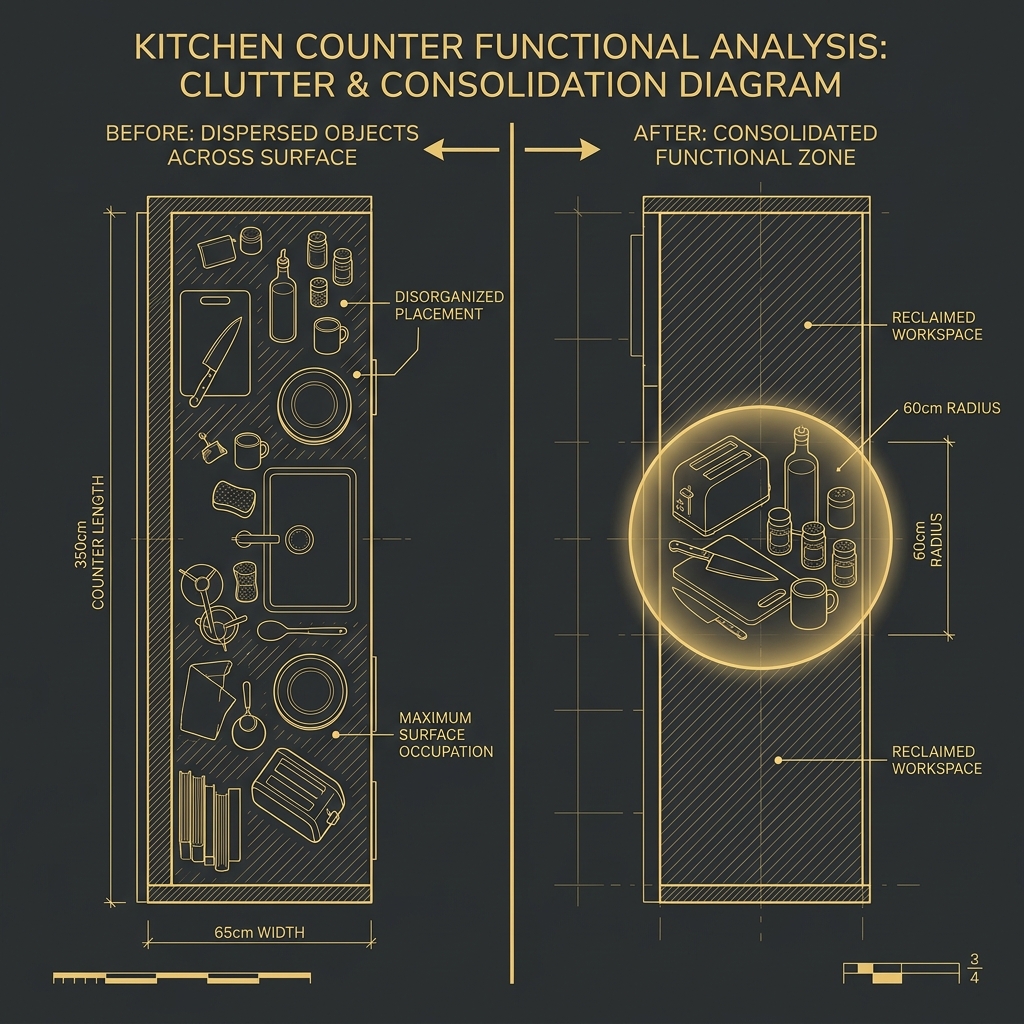
2. SEPARATE L10 — Functional Separation Zero overlap
Work equipment remaining visible after hours causes chronic baseline stress. Separate the zones.
→ do not eat where you work
→ do not work where you sleep
→ assign strict single functions to surfaces
If laptops are on the dining table → still wrong
If every surface has one distinct purpose → correct

DIAGNOSTIC L10 — Space Segregation Map
3. SHIFT L12 — Thermal Balance Change the state
Different identities require different environmental baselines. Shift the atmosphere.
→ use cool, bright light for work hours
→ switch to warm, layered lighting for hosting/rest
→ use zone-based temperature control

DIAGNOSTIC L12 — Energy State Transition Diagram
03 — Spatial Baselines (Non-Negotiable)
Don't memorize theory. Stay within these limits.
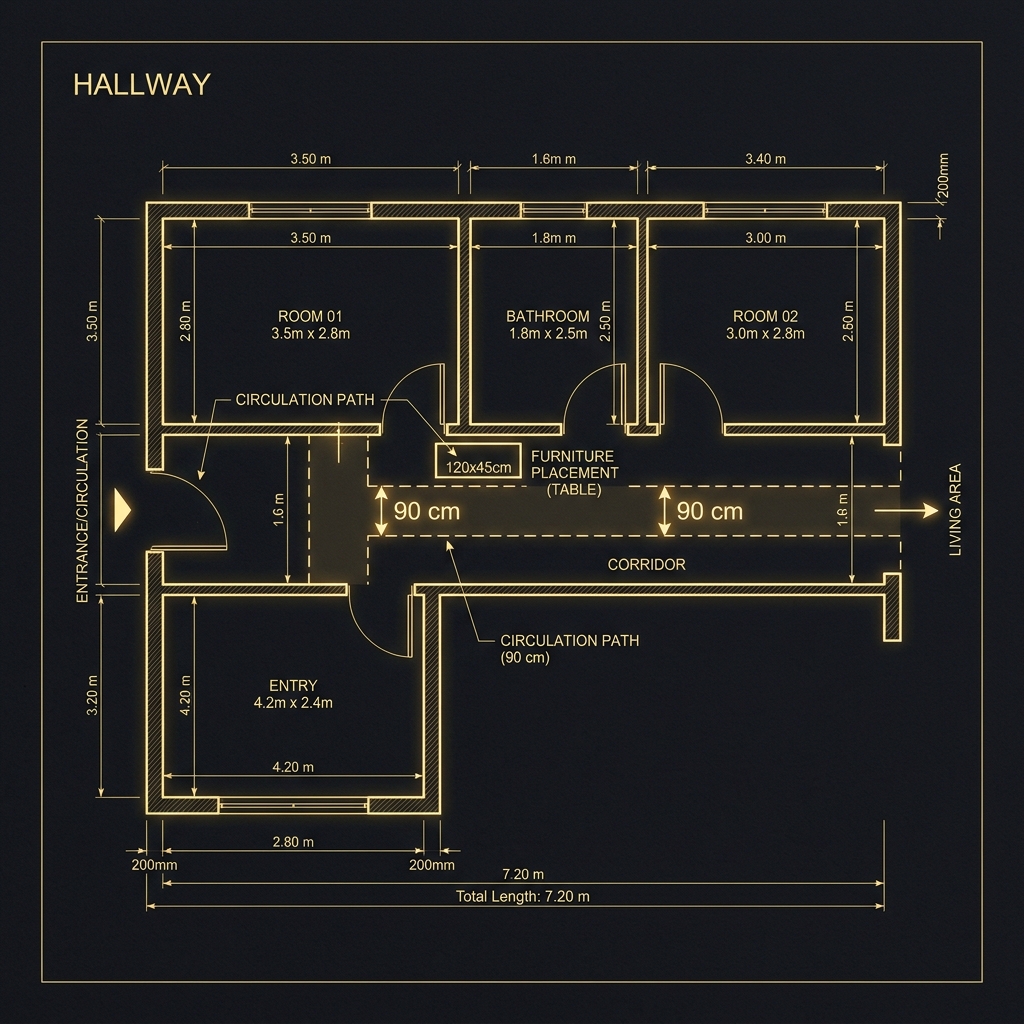
BLUEPRINT — Minimum 90cm Circulation Path Geometry
| Parameter | Limit | Why |
|---|---|---|
| Circulation | min 90 cm | Two people pass without friction |
| Storage depth | max 35–40 cm | Deeper = visual drag. The eye reads mass, not function. |
| Eye-level clutter | max 20% visible | Every visible object is a micro-decision. Limit them. |
Break these → friction returns.
04 — What to Change First (Priority Order)
Do not attempt everything at once. Follow the sequence.
- Day 1 Remove visible clutter
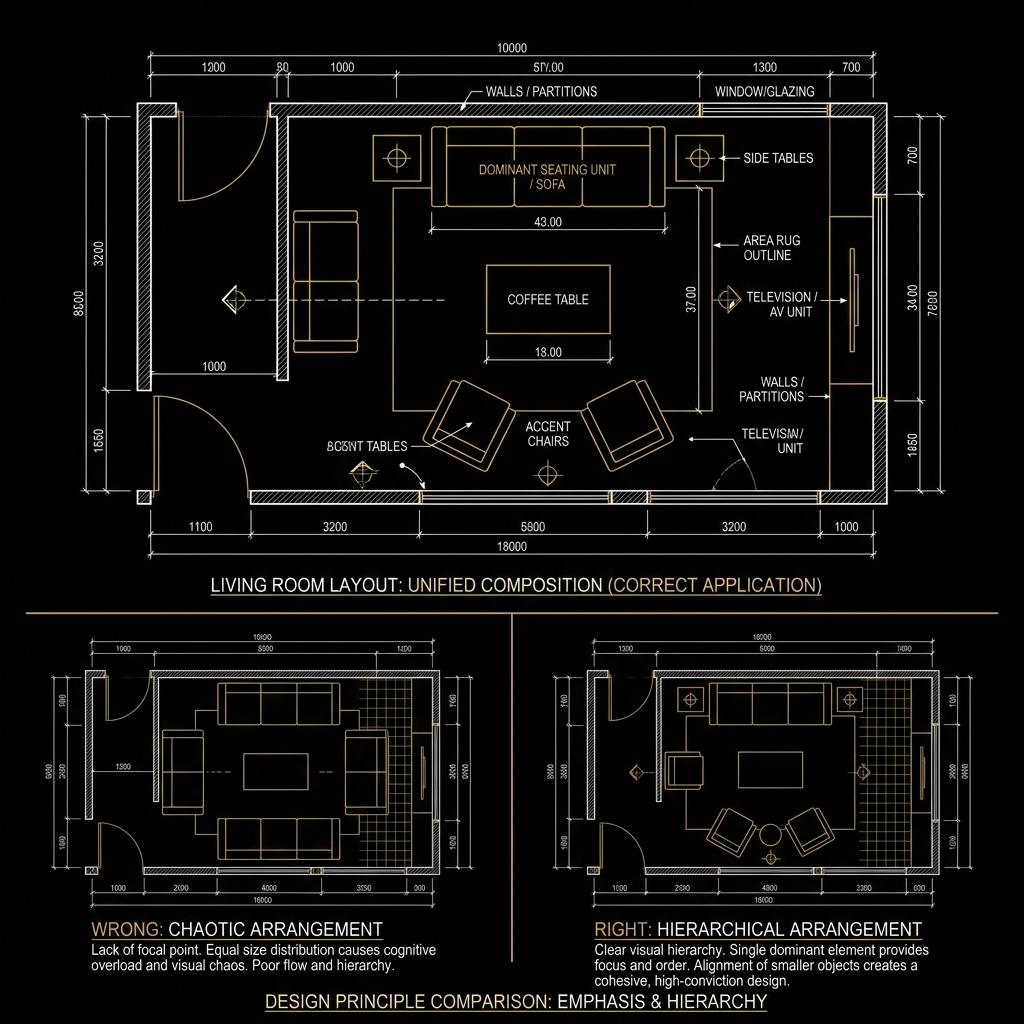
- Week 1 Create one dominant focal point
- Month 1 Upgrade storage to closed systems
05 — Implementation Kit: The Required Tools
"These are not recommendations. These are tools required to execute the system correctly."
Closed Storage Systems

- Push-to-open cabinets
- Foldable tech surfaces
- Clear center circulation
Dynamic Furniture
- Invisible work zones
- Zero overlapping activities
- No competing focal pieces
Micro-Zone Tools
- Rigid tray systems
- Under-desk cable management
- Drawer organizers (grid type)
06 — Your Environment After This
You will notice:
- flawless transition between work and life
- a living room that feels like a home, not an office
- reduced end-of-day anxiety

GOAL STATE — Realistic Representation of Dual-Identity Space
Not because you changed yourself.
"Because the space adapted to your duality."
07 — Common Failure (Read This)
Most people stop at "buying a nicer desk". This is a trap.
If the desk is always visible, the visual reminder of work never leaves your living space.
You will be tempted to blend the zones — putting a monitor on the dining table or working from the sofa. This fails. The problem is not the furniture. The problem is visibility. Conceal first. Decorate later.
The system must shift identities. Not just look pretty.
08 — Self-Check (After Applying)
Verify your work. Do not skip this.
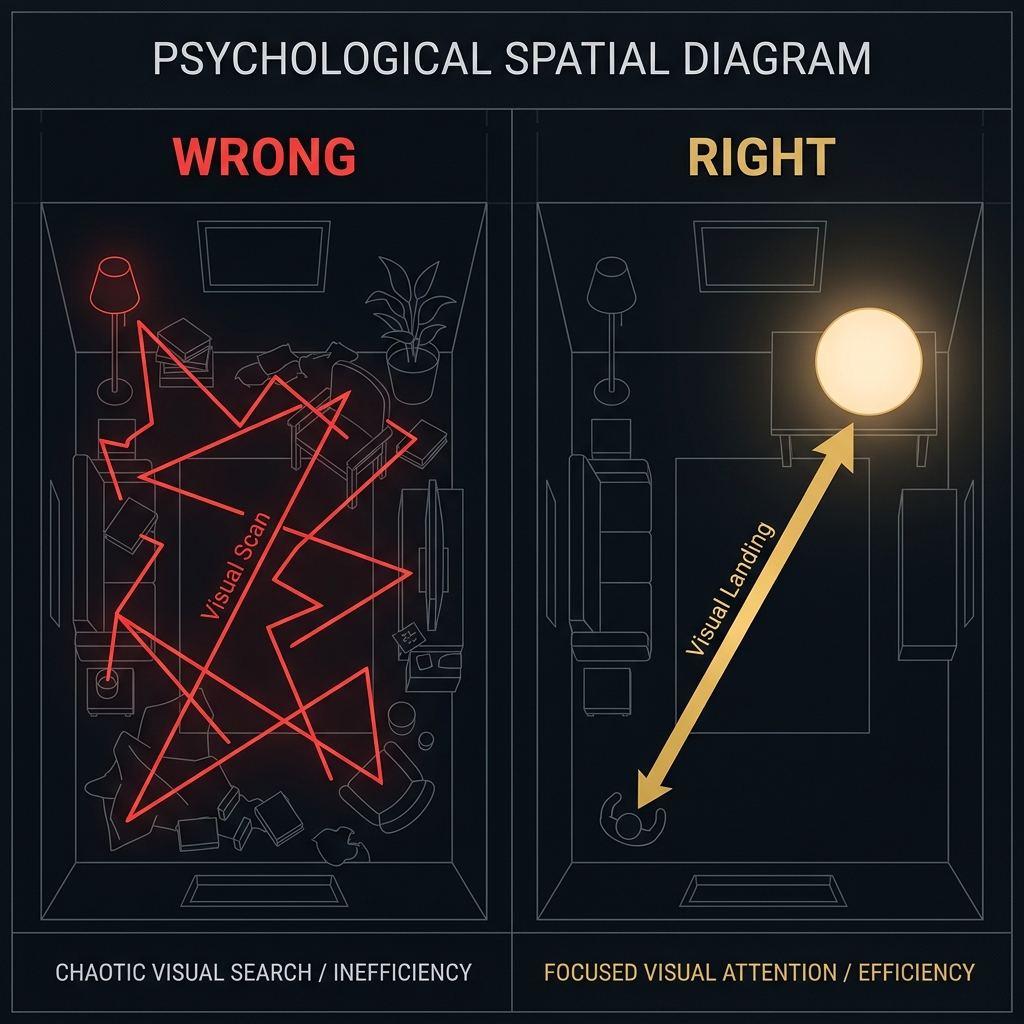
SELF-CHECK — Eye Flow Analysis: Zigzag vs. Landing
Run this check after applying each correction:
→ Can you hide your workspace in under 30 seconds?
→ When you sit on the sofa, is work completely out of sight?
→ Do the lights shift tone when the workday ends?
If any fail → re-check L9. Kinematic concealment is usually the missing piece.
09 — Final Note
Do not keep adjusting.
Set it correctly. Once.
After this, the space shifts with your life.
Protocol Options — Correct Layout Variations
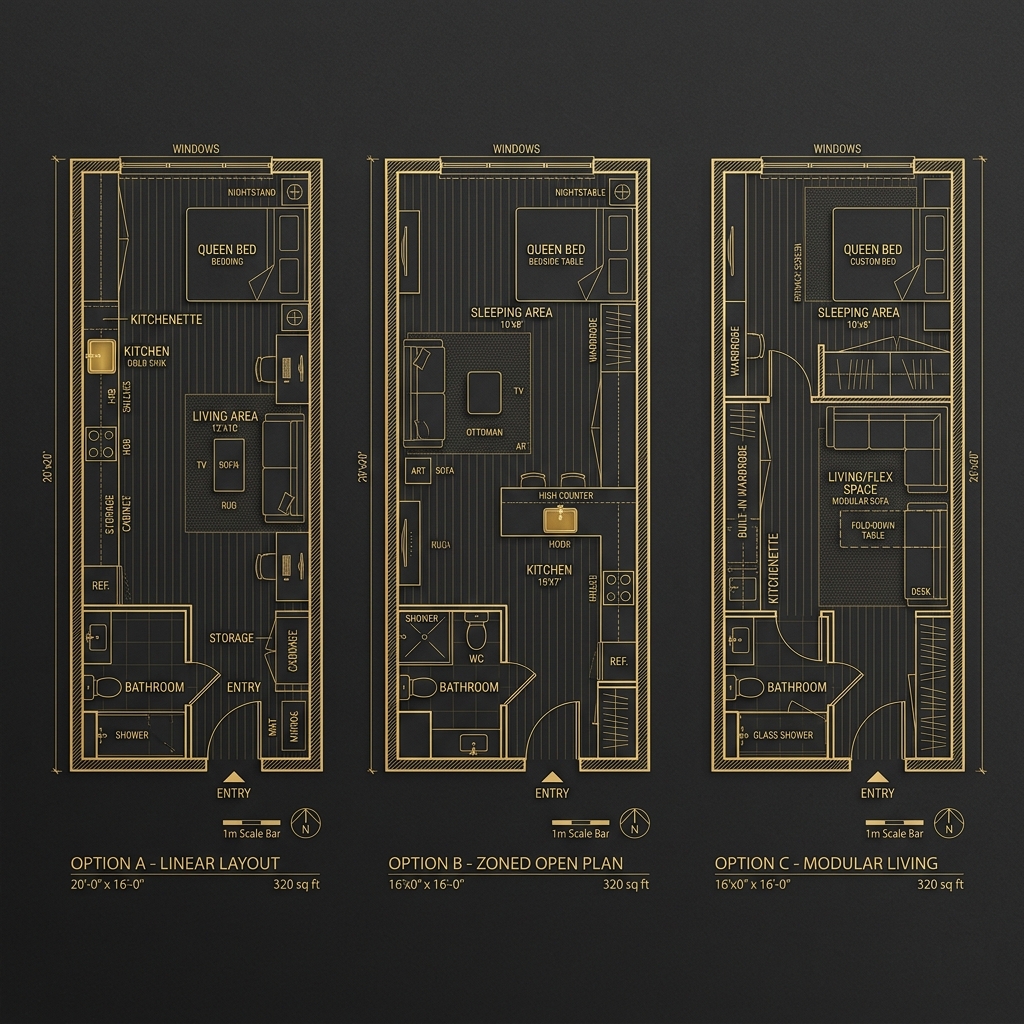
"Choose the configuration that fits your specific room geometry. All follow the Alchemist Protocol."
Is work still haunting your living room?
"Not sure if you've fully concealed the office zone? Send us your floor plan for a professional Alchemist review."
Persona Layouts — Powered by Yorukoglu Architecture
Generated through the Architectural Protocol Matrix™ · Spatial design guide — not an architectural project document.